Senin, 28 Mei 2012

Oil Cooler Basics


Oil Cooler Basics

Design and importance of Oil Coolers

Contributed By: Enginebasics.com
oil cooler basics design installationcar oil cooler basics design installation how to
To put it as simply as I can, an oil cooler is basically a radiator with oil running through it instead of water. Oil coolers are an important tool in keeping any well running motor continually running well even when pushed to the limit. Maintaining a proper oil temperature is important not only to keep the oil at its proper lubricating state, but also to aid the radiator in keeping the motor cool.
When surrounded by Porsche owners, sometimes we hear of “the good ole air cooled days” of Porsche motors. I know that even I thought this was incredible that these high performance motors could stay cool with no water-cooling, but just air, but the name hides the real story. The reality is that these motors ran upwards of 12 quarts of oil, some even as much as 16 quarts, with very large oil coolers. In reality these motors should have been called oil-cooled motors instead of air-cooled. This goes to show us how important an oil cooler can be to cooling a car.

Design of an Oil Cooler

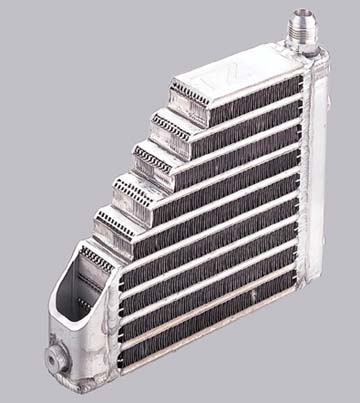
Oil coolers come in many sizes just like radiators. Choosing a proper size is based on a few factors:
1. The capacity of oil in the system
2. The power output of the motor
3. The amount of air flow and space for the cooler
4. The size of the radiator
Each of the following above will play a key roll in deciding the size of oil cooler you will need for your car. As a basic rule of thumb, most drivers will add as big of an oil cooler as can fit in a space that receives good airflow, and then add a thermostat so that the oil can be kept at a proper temperature.
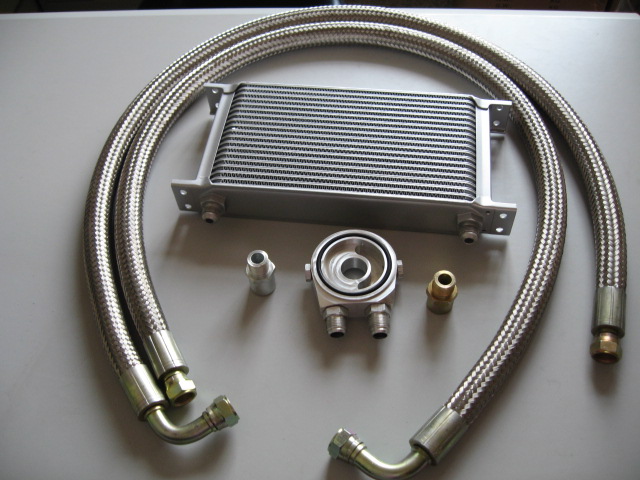
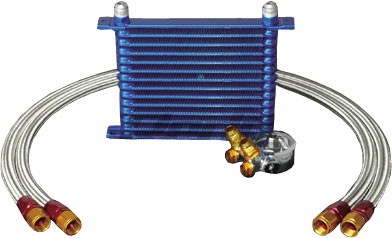
The oil cooler is designed to come in a one pass, two pass, or even triple pass design. This means the amount of times the oil will pass across the length of the cooler before it is aloud to exit. The idea being that the more passes the oil makes across the cooling front, the more heat the oil will be able to dissipate. Another important part of the design is inlet and outlet size. Be sure to choose a size that will not be too small and restrictive, as this will cause a drop in oil pressure. Most find that -8an or -10 an size fittings are sufficient. Also be sure to try and minimize length and number of bends in the oil lines as your run them to the coolers location.

Installation of an Oil Cooler car oil cooler basics design installation how to

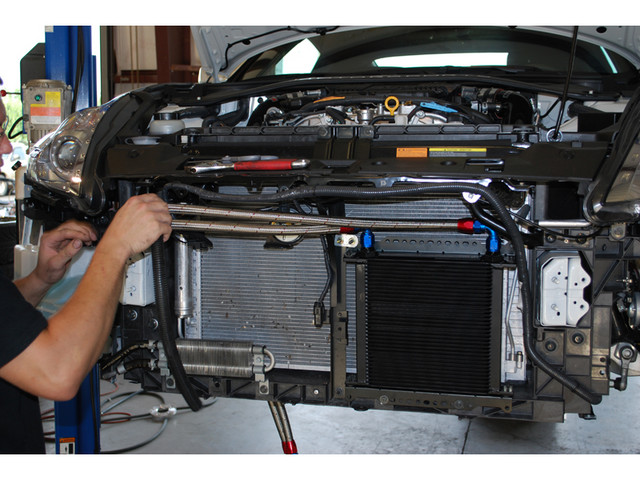
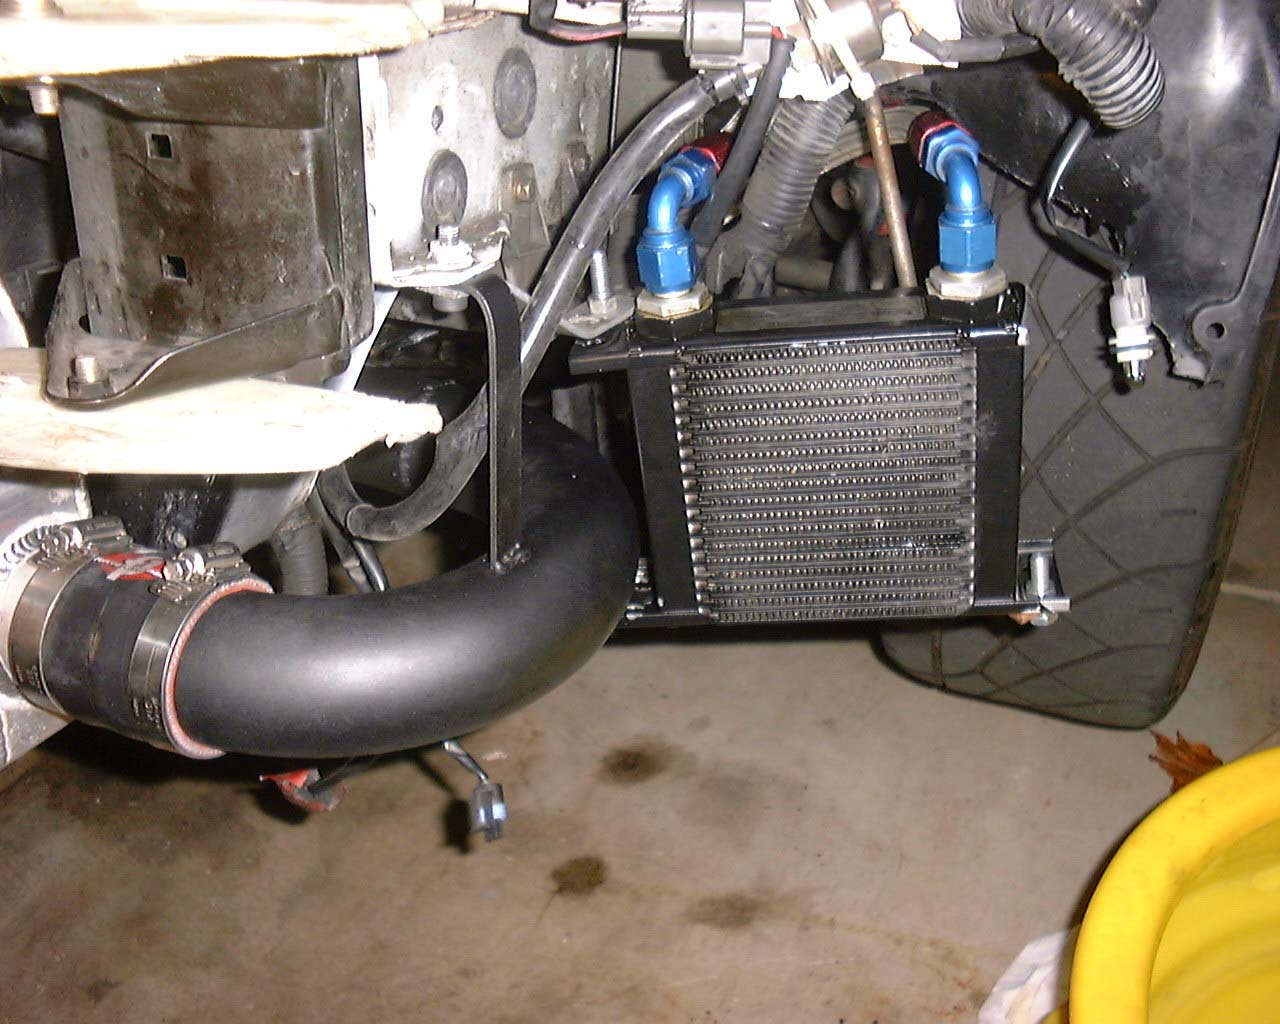
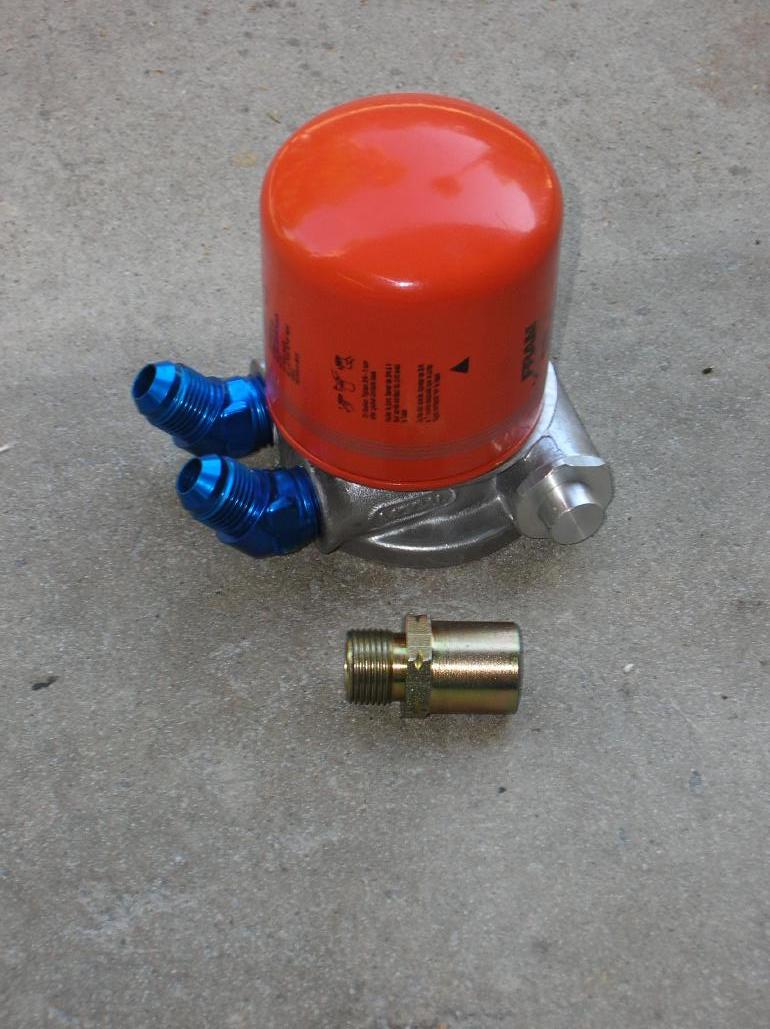
The best place to install an Oil Cooler is where it can receive a maximum amount of airflow, there by making the cooler as efficient as it can be. Most users know this, but I feel it needed to be stated anyway. Next comes running the lines to the cooler from the motor. The best place to tap into the oil supply system is at the oil filter. This is because the filter is just after the oil pump so the oil supply will have adequate pressure to move through the lines and cooler efficiently. Also this gives the oil cooler the opportunity to cool the oil before it is used by the engine, thereby making sure every part of the motor receives cooled oil at the proper temperature. Two of the best methods to adding the oil cooler lines to this part of the motor is by either a:
1. A sandwich plate car oil cooler basics design installation how to
2. Filter Relocation Kit car oil cooler basics design installation how to
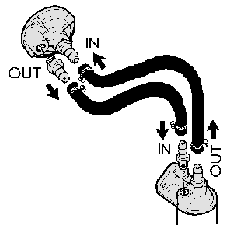
1. With a sandwich plate you are basically putting a piece of metal with an input and output barb for the oil cooler, that is sandwiched between the block and the oil filter. car oil cooler basics design installation how tocar oil cooler basics design installation how to
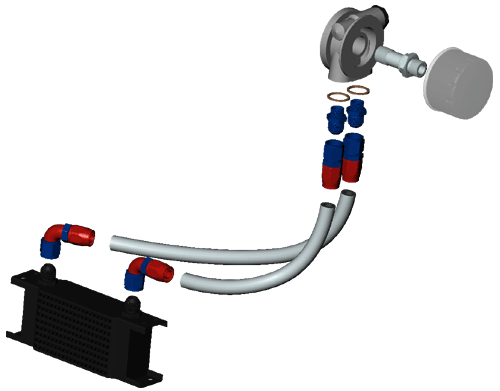
This is an easy and great way to add the outputs you need when adding the oil cooler if you have the space to add a sandwich plate on the block.
2. A Filter Relocation Kit relocates the filter to another area. So why do we care about relocating a filter when we are talking about an oil cooler? With a relocation kit you use an adapter to screw in where the oil filter was on the block to run lines to another location where the filter will be. What this does though is gives us output lines, so that instead of running right to the oil filter, we can run to an oil cooler first and then to the filter and back to the block.

The Benefits

car oil cooler basics design installation how tocar oil cooler basics design installation how to
A car motor is happiest when it has good, clean, lubricating oil running through it. To do this oil wants to be between 180-210 degrees Fahrenheit. If the oil is to hot, it will start to break down and separate causing the oil to thin, and the oil pressure to drop to dangerous levels. Having oil that is to cold can be damaging as well since the oil will not be up to temperature and not at its proper viscosity level. The best solution is to add a thermostat controlled oil cooler. What the thermostat does is keep the oil cooler closed, and out of the loop, so that oil can be quickly brought up to temperature. Then the cooler is variably opened to maintain proper oil temperatures. If you opt to not install an oil cooler thermostat, just be sure to warm your car up a little before driving to give the oil time to heat up to a proper level.
You should now understand the basics of an oil cooler, and be able to install one on your car. If you have any questions or comments about this or other articles found here on enginebasics.com, be sure to contact us.

How to paint your own wheels


How to paint your own wheels

How to Paint your Own Wheels Rims Masking Preping Sanding Polishing Lip Wheel Rim

A step by step tutorial on how to clean up and paint your rims

Contributed By: Enginebasics.com
Wheels are a big part of the way our cars look. Having a good, clean set of wheels is great to make your particular vehicle stand out. Since our wheels/Rims see tons of abuse its hard to keep them looking good. This is a short article on how to prepare and paint your Rim/Wheels.

Step 1 Preparing the Wheel for Paint

This is by far the MOST IMPORTANT STEP. You hear body shops tell you over and over that it’s all in the prep. Anyone can shoot a couple coats of paint and work a spray gun. The real magic of a great looking paint job happens long before that process, and let me tell you, its ALL TRUE. The difference between people being blown away by how clean your paint job was even with a rattle can, and not comes from this step. Don’t rush it. Here are the steps:
Part a: Remove any existing paint currently on the wheels. There are several ways that you could do this. You could sand all the old paint off. Another method is using a paint striper and then scraping the paint off. THE BEST way to get all the paint off and get down to the bare metal is sand blasting. After trying all the previous methods I have found its just worth it to take the wheel to a sand blasting facility and having them strip the paint for the best finish. Most shops would only charge around $15 bucks per wheel anyway.
How to Paint your Own Wheels Rims Masking Preping Sanding Polishing Lip Wheel Rim
Part b: Once ALL pre-existing paint has been removed, file down any large or deep scratches. Be careful not to put to much pressure on your file or be to aggressive.
Part c: Remove all light and shallow blemishes from the wheel by first going over it with some 150 grit or 300 grit sand paper. Then move to a 500 grit sand paper making sure the wheel is very smooth to the touch. At this point the wheel should look like bare metal with no nicks or deep scratches, but just the small scratches and swirl marks left behind by the sand paper.

Step 2 Masking off the wheel

Many wheels today have intricate designs or polished lips that you want to keep their nice polished shine too. You will want to be sure to protect this finish as best you can. Be sure to mask these areas off with painters tape and be careful when working close to these areas. Some people say a wheel design is too impossible to mask off. This is where a razor blade will come in handy. Mask off the wheel and then with your razor blade trace off the area you need to stay covered and remove excess tape. As you can see in the photo’s below. Masking can be very meticulous depending on the design of the wheel.
How to Paint your Own Wheels Rims Masking Preping Sanding Polishing Lip Wheel RimHow to Paint your Own Wheels Rims Masking Preping Sanding Polishing Lip Wheel Rim

Step 3 Priming the wheel

Priming the wheel is important not only to make sure you get good paint adhesion, but also to add another layer that can aid in keeping moisture out of the wheel so that it blocks rusting. If you have an aluminum alloy wheel then you don’t have to worry about the rusting, but you should still prim the wheel to help with adhesion and show any blemishes you may have missed in your prep work. Allow the wheel to dry and inspect the wheel for high or low spots, or for nicks or scratches that are still visible. This is your last chance to make any final corrections. It’s a pain to have to remove the primer and sand the area down until its fixed, but just take your time to do it now and you will thank yourself later for the extra effort.
How to Paint your Own Wheels Rims Masking Preping Sanding Polishing Lip Wheel Rim

Step 4 Painting the wheel

This seems pretty straightforward whether you are using an actual spray gun or a rattle can. Remember, many light coats make a great paint job. You’re not going to paint the wheel in one go. With paint cans it usually takes at least 3 coats before you get the full coverage of the wheel. Many do it yourself’ers make the mistake of thinking that you should get full coverage and color on the first coat. This is not true, and you will get terrible runs and blotching if you attempt to lay the paint down that thick. Just tell yourself that after the first coat the wheel should look TERRIBLE, and you will know that your doing it RIGHT. I know that sounds strange, but that is how light your first coat is going to look with a rattle can.

Step 5 Clearing the wheel

We went through all this hassle to have a nice shiny wheel and paint job so don’t skimp on this step. Adding several coats of clear to a paint job will give it that shine your looking for. I have found that the only rattle can clear coats that turn out nice can only be found a paint supply shops. The local shop to me has a clear made for door jams and such that is nice and thick. It’s perfect. Lay down at least 2 coats of clear.

Step 6 Bring out the Buffer

It’s time now to break out the buffer and buff those wheels. Rattle can paint jobs get a lot of crap for turning out bad, when in reality they just need to be buffed. Spray Cans paint and clear coats lay a little rough on the surface. With a quick buff job to lay down those high spots, the paint can jobs can look just as good as doing it with a professional paint gun. The problem is that most people don’t own a paint buffer or they just skip this step.

Step 7 Remove Masking tap and Polish

The moment you have been waiting for. Now its time to remove the entire masking tape being very careful to remove it slowly and not pull up any paint. This is where you will be able to see how good of a job you did in masking. This is also the time to get ready to do some polishing. On aluminum wheels often people mask off the lips or parts of the wheel they want to leave bear metal so that they can polish them to a shine. Be careful not to get to much polish on your freshly painted areas. If you do, you should be all right though and it should be able to be cleaned with soap and water.
How to Paint your Own Wheels Rims Masking Preping Sanding Polishing Lip Wheel RimHow to Paint your Own Wheels Rims Masking Preping Sanding Polishing Lip Wheel Rim
Pre Buffing and Polishing - - - - - - - - - -Post Buffing and Polishing
Notice a difference?

Summary

Not so bad right? If your curious the amount of time it takes to do a good paint job on a set of wheels, the pictures shown in this article have about 12 hours of work on them. I know that I could have done the job in 3 hours and they would look 80% as good as they do now. That last 20% to make them look professionally done takes 4X the time, but in the end is worth it. As long as you take your time, and don’t rush you can get great results.

SPACER JAPAN WHEEL SPACER


                            CODE      : SPACER JAPAN
                            PRICE     : RM200 FOR 2 PCS
                            PCD         : CONVERT 114 KE 100
                            TEBAL    : 0.5 INCI, CENTER CONE 7CM

PEMASANGAN FI-Z TURBO FAN


pemasangan ram paip Gen2 dan lokasi kipas simota


throttle body

lokasi nak pasang kipas simota kalau longgar lilitkan tape dikelilingnya,kalau ketat buka getahnya.
lokasi kipas di ram paip

PEMASANGAN TURBO TIMER


TURBO TIMER INSTALLATION /DIY MEMASANG TURBO TIMER.


turbo timer
1.Read first the instruction given by the manufacturer before you installing this gadget.
a)Red=forever positive
b)Yellow=for key switch second positive=electronic assay
c)blue=key switch engine
d)black=negative
e)brown=hand brea
Sebelum memasang baca dahalu arahan yang yang dibekalkan oleh pengilang merah=wiring terus dari punca positive beteri(red =forever positive)
kuning=wiring kunci eksesori(yellow=for key switch second positive=electronic assay)biru=wiring kunci engine(blue=key switch engine)
hitam/black =negative
brown/perang=hand brake
switch cover has been remove(switch cover sudah dibuka) test lamp

2.Remove switch cover so you can make a wire connection more easy.Here i was stucked because i dont have a car wiring diagram but dont worry we can use the test lamp to help us to identify them.Mark all the identified wire.( buka cover switch supaya anda dapat membuat sambungan wayar disitu.kat sini saya dah stuck tak ada gambarajah wiring kereta , jangan risau kita boleh gunakan test lamp untuk mengecam setiap satu wayar tersebut.)
aligator clip(aligator klip )


PERHATIAN=


Kalau boleh semasa mengesan wayar gunakan voltmeter test(,alat ini boleh dibeli kat hardware harganya sekitar rm20 ke rm40) kerana alat ni arusnya tak sekuat arus dari test lamp.Jangan gunakan test lamp untuk menguji peralatan elektronik kereta anda kerana arus dari mentol test lamp kadang-kadang boleh melebihi 12volt dan akan merosakan peralatan elektronik yang berhampiran.BRO SAYA GUNAKAN ALAT NI SEBAB IA MUDAH UNTUK SAYA ,LAGI PUN KERETA SAYA TAK DE ECM (COMPUTER BOX),TAPI KALAU UNTUK NEW BEGINER SEBAIKNYA GUNALAH VOLT METER.


3.How to use the test lamp=alligator clip can be connect to anypart of car body,the needle is injected in to the wire for identify.Turn the switch on one by one and identify them.Mark all the identified wire.cara menggunakan test lamp=aligator klip boleh disambung dimana -mana body kereta,bahagian jarum dicucuk ke dalam wayar yang hendak dikesan.putar kunci switch satu persatu dan test wayar.(BILA MENTOL MENYALA TERUS CABUT TEST LAMP DARI WAYAR,KALAU MENTOL MENYALA TERLALU LAMA ,ARUS DARI MENTOL BOLEH MENGALIR KE PERALATAN ELEKTRONIK YANG BERHAMPIRAN DAN BERKEMUNGKINAN MEROSAKANNYA.)tandakan wayar yg telah dikenal pasti satu persatu.

4.Before starting your work please open negative battery source first .This is to avoid any short circuit occurrence.(sebelum memulakan penyambungan buka punca negative bateri terlabih dahulu untuk mengelakan sebarang kejadian litar pintas.) 5.Open the switch connector so connection task is more easy to do(buka conector suis supaya anda mudah membuat sambungan.) 6.One of the wire from adaptor is connected to another wire from switch.All togather is three wire ,connect them one by one and tape the connection with electrical tape securely.(adaptor dari turbo timer sedang disambung dgn salah satu wire suis,semuanya ada tiga wayar.so selesaikan semuanya dan tapekan sambungan sekemas-kemasnya.0
7.connect the adaptor to turbo timer and connect back the wiring switch(sambungan adaptor tadi ke turbo timer dan sambung semula conector ke punca suis.)
hand break switch(suis hand break )

make one connection to hand break switch(buat sambungan disuis hand break )


tape wire securely,if can solder it.(tape wayar kemas-kemas kalau boleh shoulder. )
8.Remove hand break cover and make connection at the hand break switch.If you skip this the timer still can work.Many people skip this procedure but for saftey purpose is batter for you to do the connection.(buka cover hand break dan buat sambungan di suis hand break,kalau tak sambung pun timer boleh berfungsi tapi untuk saftey baik sambung bukan susah pun. )


9.Last step is connect negative wire to car body(.akhir sekali sambungkan wayar negative kemana -mana body.)
10.Re-connect the negative battery source and set turbo timmer according to engine type or the timer you like to hold.(sambungkan negative bateri semula dan set turbo timer mengikut kesukaan anda.selesai )

PEMASANGAN SPRING BUFFER


memasang spring buffer wira bahagian belakang


memasang spring buffer wira bahagian belakang
1.pilih size yg sesuai,wira belakang size D
amt spring buffer

2.jack kereta dgn selamat
3.buka roda
4.spray alur getah amf atau coil spring dgn window cleaner atau air sabun.


5.masukkan spring buffer ke celah-celah spring..saya punya spring dah pakai honda civic sm4,jadi susah sikit nak masuk sebab spring dia besar)
wira amt spring cushion buffer


6.check semula dan pastikan alur getah masuk semua ke dalam spring coil
7.Pasang roda,dan turunkan jeck,..selesai


video boleh check kat facebook..video pemasangan spring buffer

PEMASANGAN AUTO OIL COOLER


Memasang automatic gear box oil cooler / Autotransmission oil cooler installation proceduer


Memasang automatic gear box oil cooler / Autotransmission oil cooler installation proceduer

Gear Box kereta saya dah lebih 7tahun,penyakit dah datang,biasalah tu barang mekanikal mestilah rosak.Gear drive dah kerap jadi gear free.Semasa service gearbox saya terus pasang oilcooler sekali.Selepas service,gearbox masih beroperasi dengan baik dah masuk dua minggu gear bergerak lancar.Memang penting minyak gearbox ni yee,,korang kalau service gantilah dengan minyak gear yg berkualiti tinggi baru tahan gearbox tu.
Oil cooler saya pasang jenis JASMA yg 13row untuk keterangan boleh rujuk kat bawah=


JASMA 

SuperCooler oil cooling systems

* In addition to transmission coolers, JASMA SuperCoolers are suitable  
   as engine,  power steering & differential fluid cooler.

* Wide range of sizes are available - suitable for any application.

* These are most efficient coolers by size & weight you can buy.

* More efficient than ordinary tube & fin coolers.

* Rigid " stacked Plate " design is resistant to damage from flying debris.

* All aluminum brazed construction provides superior strength light
   weight & minimum size.
  
 * All cooler are pressure tested to 200 PSI.


JASMA SuperCooler are 100% aluminum construction and use stamped plates sandwiched together to create one of the most efficient oil cooler devices available.
Not only does this unique design provide for maximized cooling through more efficient heat dissipation but it also provides a much sturdier cooler which is practically impervious to flying rocks or other debris. The JASMA SuperCooler also offers an additional feature known as " Low Pressure Drop ". The coolers assembled with hose bard ends include a unique bypass feature allowing a controlled amount of ATF to bypass the  stacked plate core when the fluid s cold. This is beneficial in cold climate area to guard against lube system failure. Controlled by viscosity, fluid is returned directly to the lube circuit through bypass openings in the stacked plate core. This highly efficient design combines improved protection against lube system failure with  the required levels of optimal heat transfer.
Bahan yg diperlukan,oilcooler,hose,clips
Oil cooler boleh disambung terus dari gear box atau dari pipe radiator auto.untuk kereta wira ni saya sambung terus dari gear box ke oil cooler,sebab pipe radiator penyejuk gear box saya ada masalah sikit.kalau pipe radiator anda ok,lebih baik sambung terus disitu boleh jimat hose pvc dan minyak gear lebih dapat penyejukan.
Cara-cara
1.Buka bumper hadapan,pilih tempat yang sesuai untuk menempatkan oil cooler tersebut.kalau boleh jangan terlalu jauh dari gear box

2.buka dua pipe penyejuk gear box,kalau nak sambung terus dari radiator buka satu sahaja.


                                  longgarkan clip utk mecabut hose
                                  

                                         hose sudah dicabut

3.ukur dgn tepat panjang oil hose yg diperlukan.

4.Pasang oil cooler ditempat yg anda pilih ,gunakan plat aluminium untuk menggantung coller ke body kereta atau apa2 cara yg anda fikirkan sesuai.janji benda tu terpasang dengan kukuh.mounting atas saya gunakan plat aluminium yg bawah saya ikat dengan cable tie saja.

5.pasang  kedua-dua oil hose dari gerar box terus ke oil cooler(.kalau nak sambung ke radiator caranya satu hose dari gear box sambung ke oil cooler,dari oil cooler sambung ke radiator dan dari radiator sambung ke gear box)

6.ketatkan klip hose secukupnya.
7.Tambahkan minyak gear box secukupnya.lihat post service gear box auto untuk menambah minyak gearbox auto.chek dikawasan sambungan hose ,pastikan tiada berlaku kebocoran disitu.
8.Pandu kereta anda,pastikan gear box berfungsi dengan baik.pegang hose dan oil cooler kalau terasa panas bermakna minyak gear box mengalir dengan lancar di oil cooler tersebut.
9.Pasang bumper semula…selesai
Diberdayakan oleh Blogger.

Arsip Blog

Cari Blog Ini


© 2013 AUTO ACCESSORIES INFO. All rights resevered. Designed by Templateism

Back To Top