How to paint your own wheels
A step by step tutorial on how to clean up and paint your rims
Contributed By: Enginebasics.comWheels are a big part of the way our cars look. Having a good, clean set of wheels is great to make your particular vehicle stand out. Since our wheels/Rims see tons of abuse its hard to keep them looking good. This is a short article on how to prepare and paint your Rim/Wheels.
Step 1 Preparing the Wheel for Paint
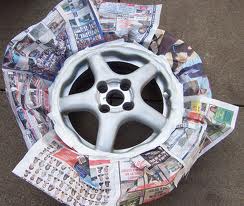
This is by far the MOST IMPORTANT STEP. You hear body shops tell you over and over that it’s all in the prep. Anyone can shoot a couple coats of paint and work a spray gun. The real magic of a great looking paint job happens long before that process, and let me tell you, its ALL TRUE. The difference between people being blown away by how clean your paint job was even with a rattle can, and not comes from this step. Don’t rush it. Here are the steps:Part a: Remove any existing paint currently on the wheels. There are several ways that you could do this. You could sand all the old paint off. Another method is using a paint striper and then scraping the paint off. THE BEST way to get all the paint off and get down to the bare metal is sand blasting. After trying all the previous methods I have found its just worth it to take the wheel to a sand blasting facility and having them strip the paint for the best finish. Most shops would only charge around $15 bucks per wheel anyway.
Part c: Remove all light and shallow blemishes from the wheel by first going over it with some 150 grit or 300 grit sand paper. Then move to a 500 grit sand paper making sure the wheel is very smooth to the touch. At this point the wheel should look like bare metal with no nicks or deep scratches, but just the small scratches and swirl marks left behind by the sand paper.
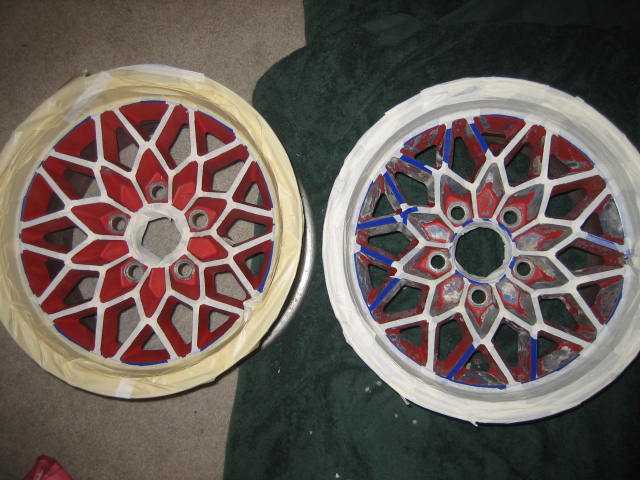
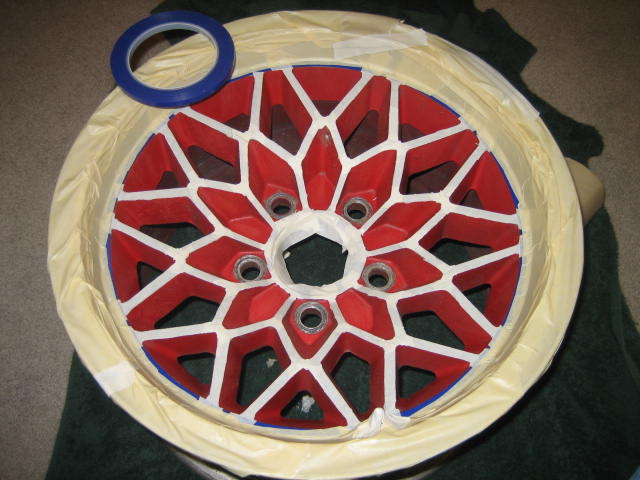
Step 2 Masking off the wheel
Many wheels today have intricate designs or polished lips that you want to keep their nice polished shine too. You will want to be sure to protect this finish as best you can. Be sure to mask these areas off with painters tape and be careful when working close to these areas. Some people say a wheel design is too impossible to mask off. This is where a razor blade will come in handy. Mask off the wheel and then with your razor blade trace off the area you need to stay covered and remove excess tape. As you can see in the photo’s below. Masking can be very meticulous depending on the design of the wheel.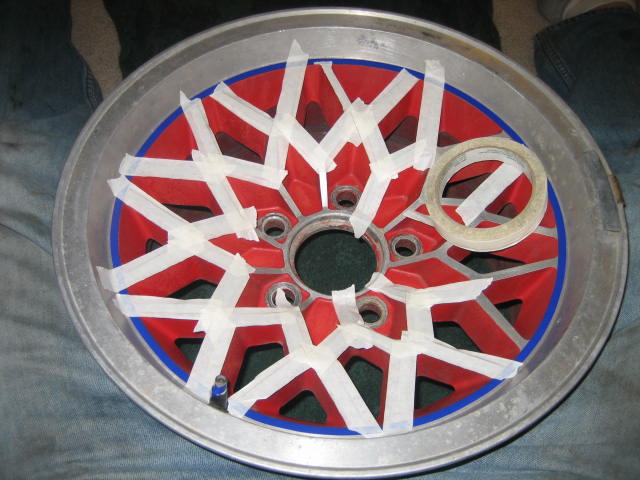
Step 3 Priming the wheel
Priming the wheel is important not only to make sure you get good paint adhesion, but also to add another layer that can aid in keeping moisture out of the wheel so that it blocks rusting. If you have an aluminum alloy wheel then you don’t have to worry about the rusting, but you should still prim the wheel to help with adhesion and show any blemishes you may have missed in your prep work. Allow the wheel to dry and inspect the wheel for high or low spots, or for nicks or scratches that are still visible. This is your last chance to make any final corrections. It’s a pain to have to remove the primer and sand the area down until its fixed, but just take your time to do it now and you will thank yourself later for the extra effort.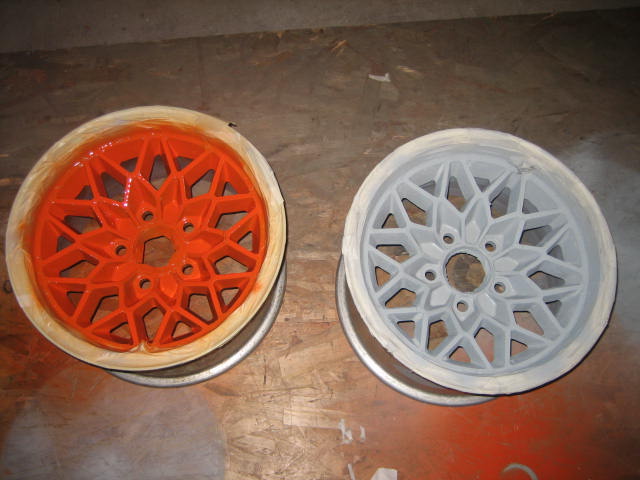
Step 4 Painting the wheel
This seems pretty straightforward whether you are using an actual spray gun or a rattle can. Remember, many light coats make a great paint job. You’re not going to paint the wheel in one go. With paint cans it usually takes at least 3 coats before you get the full coverage of the wheel. Many do it yourself’ers make the mistake of thinking that you should get full coverage and color on the first coat. This is not true, and you will get terrible runs and blotching if you attempt to lay the paint down that thick. Just tell yourself that after the first coat the wheel should look TERRIBLE, and you will know that your doing it RIGHT. I know that sounds strange, but that is how light your first coat is going to look with a rattle can.Step 5 Clearing the wheel
We went through all this hassle to have a nice shiny wheel and paint job so don’t skimp on this step. Adding several coats of clear to a paint job will give it that shine your looking for. I have found that the only rattle can clear coats that turn out nice can only be found a paint supply shops. The local shop to me has a clear made for door jams and such that is nice and thick. It’s perfect. Lay down at least 2 coats of clear.Step 6 Bring out the Buffer
It’s time now to break out the buffer and buff those wheels. Rattle can paint jobs get a lot of crap for turning out bad, when in reality they just need to be buffed. Spray Cans paint and clear coats lay a little rough on the surface. With a quick buff job to lay down those high spots, the paint can jobs can look just as good as doing it with a professional paint gun. The problem is that most people don’t own a paint buffer or they just skip this step.Step 7 Remove Masking tap and Polish
The moment you have been waiting for. Now its time to remove the entire masking tape being very careful to remove it slowly and not pull up any paint. This is where you will be able to see how good of a job you did in masking. This is also the time to get ready to do some polishing. On aluminum wheels often people mask off the lips or parts of the wheel they want to leave bear metal so that they can polish them to a shine. Be careful not to get to much polish on your freshly painted areas. If you do, you should be all right though and it should be able to be cleaned with soap and water.
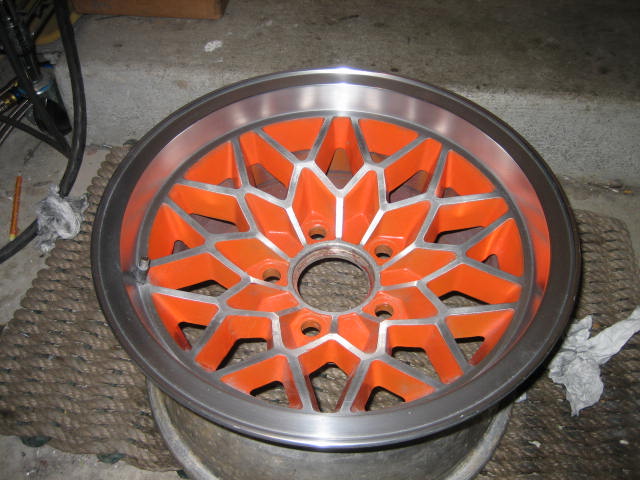
Notice a difference?
Summary
Not so bad right? If your curious the amount of time it takes to do a good paint job on a set of wheels, the pictures shown in this article have about 12 hours of work on them. I know that I could have done the job in 3 hours and they would look 80% as good as they do now. That last 20% to make them look professionally done takes 4X the time, but in the end is worth it. As long as you take your time, and don’t rush you can get great results.Written by Unknown
We are Creative Blogger Theme Wavers which provides user friendly, effective and easy to use themes. Each support has free and providing HD support screen casting.


0 komentar:
Posting Komentar